Many people might not think to search for the best blender for pureeing meat because there are plenty of people who have never thought of blenders as kitchen appliances that mince meat.
Of course, it must be said that meat grinders remain the absolute top choice if you have the budget for buying a meat grinder and if you need to make very big quantities of minced meat quite often.
Nevertheless, I also love that we can search for the best blender for pureeing meat and then use our new appliance to make delicious smoothies, mouthwatering smoothie bowls with amazing toppings, creamy soups and so many other recipes.
I have to tell you that you never know just how versatile a blender can be until you’ve perused a good cookbook for blenders.
Best Blender for Pureeing Meat Reviews
 In our household we have a meat grinder that we use especially when we make sausages or when we cook for big holidays or gatherings. If I’m cooking just for my small family, I tend to use the food processor to mince meat.
However, I must confess that it was only recently that I came across the fact that we can puree meat in a blender. For most of my life, I’ve only used blenders for delicious drinks. I’ve missed out on a lot of things.
I’m glad that I created this website because it has helped expand my love for blenders and many other kitchen appliances and cooking tools and utensils even more.
Now, let’s see which are some of the best blenders for pureeing meat and what else we can use them for.
Before that, I should mention one last thing: in theory all countertop blenders can be used to grind meat because every one of them has the pulse function. We use the pulse feature to mince meat in a blender.
Check out my article explaining what the pulse function does if you want to learn more.
1. Ninja SS351: Overall the Best Blender for Pureeing Meat
Why do I consider the Ninja SS351 one of my favorites whether we’re making smoothie bowls or pureeing meat?
Because it’s a complex kitchen appliance that has a powerful motor, interesting functions and plenty of accessories to satisfy everyone.
Moreover, at under $200, this is an affordable model. If that’s your budget, you’re going to be very interested in this model. My next one would be another Ninja, too. It has a different component but that’s one of the few things that set them apart.
Still, of the two, my favorite is this SS351 because it’s just a bit cheaper. It’s the perfect balance of price and quality.
Components
We cannot talk about about the Ninja SS351 without enumerating its components first:
- 1400-Watt unit
- 72-oz power blender & processor pitcher
- total crushing and chopping blade
- dough blade
- 24-oz nutrient extraction cup
- 14-oz smoothie bowl maker with storage lid
This is a powerful countertop blender with a 1,400 watts motor. It will work without a hitch, whether you want to blend frozen fruits, make up to 2 pounds of dough or puree meat.
The 72 oz pitcher is a really great size even for bigger families. You can grind plenty of meat cubes in very little time. Just remember to freeze your cubes of meat for 10-15 minutes before grinding them.
Another interesting aspect is that the blade for the 72 oz pitcher looks like nothing you’ve ever seen from other brands.
That’s because this picture with the total crushing and chopping blade will work both as a blender and as a food processor. You’re paying a pretty affordable price for a 2-in-1 appliance.
The dough blade can also be used in the 72 oz pitcher. You can make dough for bread, pizza and a variety of desserts. You don’t need a stand mixer anymore if you want to make a quick dough.
If all that sounds awesome, we’re still not done.
We get a 24 oz nutrient extraction cup with a travel lid if you want to make smoothies to take with you.
And we get a 14-oz smoothie bowl maker with a storage lid if you want to quickly make a smoothie bowl for one.
All these 3 vessels are attached to the same motor base.
Features
There are 6 preset Auto-IQ programs: extract, smoothie, bowl, spread, chop, dough.
It’s convenient having these programs because with one touch the blender does the work for us. And it stops automatically when it’s done. Thus, we can leave the blender alone after we’ve selected the program.
For pureeing meat, we are instructed to use the chop program. It’s also the one we use for chopping raw vegetables, just like we do in a food processor.
The chop program comes with timed pulses and pauses to give us consistent chopping results. We can run the program once for a large chop, twice for a small chop and three times for a mince.
I love these programs and the ease-of-use they present.
Of course, we can also use the blender manually if that’s what we want. It has various speeds.
If the chop program doesn’t work for you, I recommend using the pulse button for pureeing meat. Press it for a couple of seconds at a time until you’ve obtained the needed consistency.
2. Ninja BN801
There’s not a huge difference between the BN801 and SS351. Pretty much they’re both awesome and two of my favorite appliances.
The BN801 is just slightly more expensive and that’s why I decided to offer it second place.
Components
- 1400-Watt unit
- 72 oz total crushing pitcher with lid
- total crushing blades
- (2) 24 oz blending cups with spout lid
- pro extractor blades assembly
- 64 oz precision processor bowl & lid
- chopping blade for the processor
- dough blade
As you can see, the major difference is that we get a separate 64 oz processor bowl. It’s similar to what some immersion blade sets offer but for this Ninja BN801 the separate processor bowl is considerably bigger.
If you don’t already own a processor, this blender system can be perfect for you.
We also get 5 programs instead of 6. The one missing is the smoothie bowl but that’s not a big loss because you can just use the smoothie program for that one.
Thus, the 5 present Auto-IQ programs are: smoothie, ice crush, extract, chop and dough.
Use the chop program to puree meat or use the pulse feature if you want to do it manually. The chop program comes with preprogrammed pulses and pauses.
3. Vitamix E310 Explorian
When I was going through the Vitamix Cookbook, I came across a recipe for turkey burgers with cherry salsa.
The presentation for this recipe actually starts with a question: did you know you could grind meat in your Vitamix? Thus, we have it straight from the manufacturer’s writing that a Vitamix is an excellent choice for a blender for grinding/pureeing meat.
However, we are also informed that the result will be more of a very fine chop rather than the grind we’re used to getting when we’re using a proper mean grinder.
Nevertheless, that won’t bother anyone. Once it’s cooked, minced meat looks pretty much all the same. You can’t tell how it was grinded because it all looks pretty much the same after it’s cooked.
Vitamix also instructs us to cut it and partially freeze the meat before we pulse it. However, you can also freeze it for a couple of hours as a big piece and then cut it into cubes. It works either way but it takes less time to chill it when it’s cut into 1 or 2-inch cubes.
10-15 minutes in the freezer should be enough to make the cubes very cold and to harden the meat.
Chilling the meat is extremely important because it helps the blades cut the meat instead of tearing or smearing it.
Features
Vitamix E310 Explorian is one of the most affordable Vitamix models. It’s one of the main reasons why I slightly prefer this one over the Vitamix 5200.
However, if you have a budget of around $500, the price doesn’t make you wince and your sight is only set on Vitamix appliances, then go for the Vitamix 5200 because many users believe that it’s one of the best.
If your budget is around $350 and you don’t like the much more affordable Ninja blenders that I’ve reviewed as my top recommendations when we’re looking for the best blender for pureeing meat, then you can pick the Vitamix E310.
It has a 48 oz container so it’s on the smaller side of countertop blenders. But it still works for a medium-sized family.
There are also 10 variable speeds.
Vitamix doesn’t come with functions or programs that do the blending/pulsing for us at the press of a button. These are classic blenders where we control the speed.
There’s also the pulse feature and this is the one we’ll be using for pureeing meat.
4. Breville Super Q Blender: Powerful Blender for Pureeing Meat
I should mention that, in their cookbook that is included with this blender, Breville doesn’t mention using the Super Q for pureeing meat.
They have recipes for green smoothies, smoother smoothies, super hot, marginal milling, sweet sensations, nutty butters and milks, get saucy, exotic spices and pastes, double dipping, and dangerously healthy cocktails.
Thus, no mention of grinding meat.
But we can totally consider it to be one of the best blenders for pureeing meat because it has a pulse feature and that’s the one we need.
And because it’s the most powerful model in this article and probably among residential blenders.
All in all, it’s a fascinating kitchen appliance. That doesn’t surprise me because it’s Breville we’re talking about.
Components
If there is one major thing to admire about this Breville, besides its gorgeous design, it’s its extremely powerful motor.
This blender comes equipped with a 1,800 watts motor base. That basically exceeds what pretty much all countertop blenders offer. It veers into commercial blenders territory.
The difference is that, while commercial blenders can cost $1,000 or more, this Breville is half that. Well, with a price a bit over $500, it’s not exactly cheap but it does offer a whole lot for the money.
The 68 oz jug is a very nice size.
Plus, we also get a 24 oz cup. This transforms the Super Q into a personal blender. I love that we also get this cup to take a smoothie with us to help us face the day with a bit more energy.
Features
There are 5 once touch programs: green smoothie, smoothie, soup, pulse/ice crush, frozen dessert.
However, for pureeing meat we’ll need to use the pulse/ice crush button for a few seconds at a time.
Remember to freeze the cubes of meat for 10-15 minutes before pulsing them.
You might have noticed that the two Ninja models I recommended in the beginning of this article also offer plenty of accessories and programs. The advantage is that those are more than two times less expensive than this Breville. That’s a huge difference to take into account.
5. Hamilton Beach 58148A: Cheapest Blender for Pureeing Meat
If your budget is under $50 but you still want to take on a chance on a cheap blender that might turn out to be the best blender for pureeing meat, then I recommend this countertop model from Hamilton Beach.
Hamilton Beach is pretty much one of the few options we can consider if we’re looking for cheap appliances. They also make a very cheap personal blender that I like quite a bit.
Another plus for considering the Hamilton Beach 58148A is that there are reviews from users who have used it to puree meats and it has worked wonderfully without any disappointments.
That’s a big plus. And it’s the main reason for including it in my recommendations.
Do I think that it’s the perfect blender and everyone will be happy with it? There’s no such thing. Even Vitamix has buyers who complain plenty about their models and those models are 10 times more expensive than this Hamilton Beach.
Features
It’s not the most powerful but I still think that the 700 watts motor base will be capable of doing plenty. It’s exactly what I would expect in this price range.
Moreover, it comes with a wave action system that continuously pulls mixture down into the blades. That’s a good feature to have.
What I really like a lot is that we have 12 blending functions gathered under 5 buttons.
Some might not like that there are no speeds to manually control their blending. On the other hand, some might love these blending functions because it makes this model very easy to use.
The first 3 buttons are for: off, mix, milkshake, easyclean, puree, smoothie, ice drink.
The last 2 buttons are under the pulse function: dice, chop, salsa, grind, crush ice, grate.
Thus, in only 5 buttons, the Hamilton Beach 58148A offers the same versatility that much more expensive blenders do.
The 40 oz jar is not the biggest but it’s good enough.
If we want to process meat, the manufacturer advises us to cut into ½-inch cubes and to process 8 oz of cubes at a time. Use the fourth button.
How to use a blender to puree meat
If you’ve ever used a meat grinder, you already know what needs to be done to prep meat for mincing.
Some of those principles apply when it comes to pureeing meat in a blender.
The major difference and one of the most important things to keep in mind is that the meat should be cut in 2-inch cubes.
But let’s see what else you should know before reaching the step of cutting up our big piece of meat in small 2-inch cubes.
1. Chill the meat before pureeing it in a blender
I prefer starting with chilled meat because warm meat is soft meat, which makes it harder to chop. Obviously, you need a very sharp knife.
Chill your meat for a couple of hours in the freezer.
Key principle to pureeing meat in a blender: keep the meat and the equipment cold.
If you can put your pitcher in the fridge a couple of hours before getting started, that would be phenomenal.
We don’t want raw meat to get warm.
2. Trim excess fat and connective tissue
We can only mince lean meat in a blender, totally cleaned of fat and connective tissue.
But we can puree whatever meat we want, whether it’s chicken, pork, beef, etc.
3. Cut the meat into 2-inch cubes
If you’ve chilled the meat in the freezer for at least a couple of hours, it will also be easier to cut it into 2-inch cubes cubes.
You can even cut it into 1-inch cubes if you have more patience.
The other option is to chill the cubes of meat after you’ve cut them.
Thus, if you don’t want to wait a couple of hours until a big piece of meat is cooled down properly, then you can put the cubes in the freezer for at least 10-15 minutes or until they turn hard and very cold.
We need small cubes so that the blender can puree it before the meat gets too hot. Blenders are powerful machines and they can heat up ingredients with their powerful rotary blades.
4. Use the pulse feature
I prefer using the pulse feature because it achieves a more even grind. It will also prevent the blender from heating up the cubes of meat.
When we’re using the pulse setting, only press it for a couple of seconds at a time because this is the setting on which the appliance runs at its highest speed. Thus, don’t keep it pressed for long bouts of time.
Press the pulse button and release it after a few seconds. You can repeat until you get the desired texture.
When I talked about how to shred chicken in a blender, I also advised using the pulse feature to achieve equal tiny pieces of chicken. Thus, we should never neglect the pulse setting because it can be helpful for plenty of things.
However, I must also mention that there are other functions we can use.
For example, there are Ninja blenders that feature the chop function. In their instruction manual, we are advised that we can puree meat using the chop program.
Their chop program comes with timed pulses and pauses to give us consistent chopping results. We can run the program once for a large chop, twice for a small chop and three times for a mince.
As you can see, even Ninja mentions only the word pulses, once again demonstrating that the pulse feature is the best for pureeing meat in a blender.
Thanks to using the pulse function, we control how smooth we want to puree the meat, which is awesome.
How to clean a blender after pureeing meat
Pureeing meat in a blender can be a bit messier and fattier than making a smoothie. By the way, if you’re used to making hummus in a blender, you know what I’m talking about because that’s a sticky food making.
It’s very important to clean the blender very well after using it to make minced meat.
Immediately after you’re done, I recommend adding a few drops of liquid dish soap to the pitcher. Add a bit of warm water and then turn the blender on top speed.
A few seconds of blades going at full speed should be enough to clean pretty much the entire pitcher.
If you’re not satisfied yet, you can place it in the dishwasher for a second cleaning. Or grab a kitchen sponge and do a manual washing. Grab some gloves if you’re afraid of being nicked by the blades. Those things are sharp so even a small accidental brush against them will result in a tiny cut.
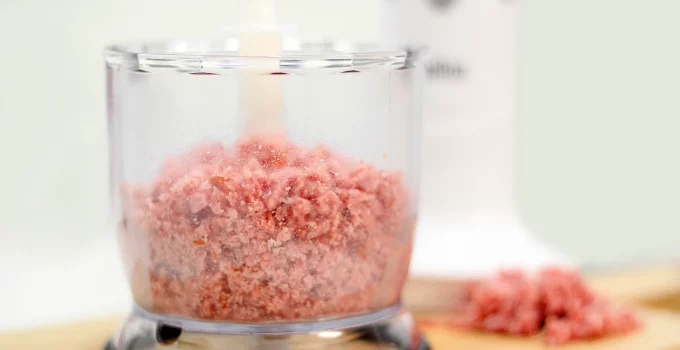
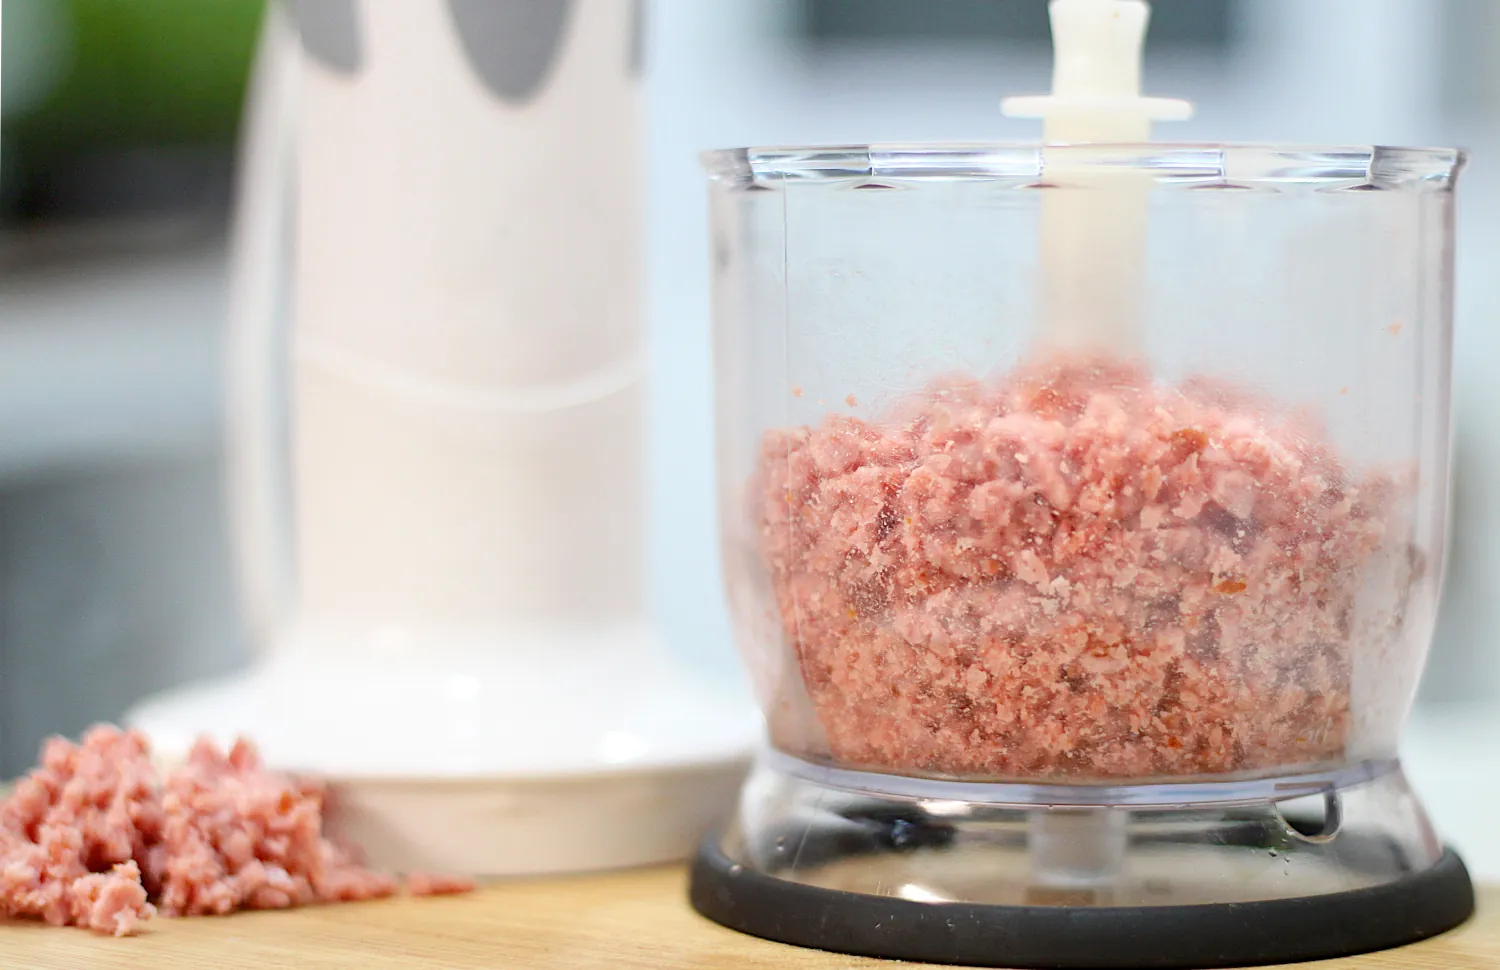
Can an immersion blender puree meat?
On its own, I don’t believe that an immersion blender can puree meat.
We mainly use immersion blenders to make mayonnaise, purees, creamy/chunky soups, dressings, sauces, baby food, whip egg whites, and even for making smoothies. Although smoothies made with an immersion hand blender are not as smooth as those made in a countertop or personal blender.
However, there are also immersion blenders that come with a chopper/tiny processor attachment. If that’s the case, you can puree meat with an immersion blender by attaching the motor base to the chopper attachment.
You just have to follow pretty much the same instructions I mentioned above.
Thus, if you want an immersion blender that can also double as a processor, I recommend getting a set that includes a chopper. Those complete sets are all pretty affordable.
The chopper is not very big but it’s more than enough for most recipes. I love mine and I use it even more often than my big processor because it’s just easier to grab and clean. And that’s how you can transform an immersion blender into the best blender for pureeing meat.
Best Blender for Pureeing Meat Buying Guide
I’ve already reviewed what I believe to be the best choices for a blender for pureeing meat. But let’s see which are the most important features we must pay attention to.
Frankly, there’s not much to consider when it comes to pureeing meat in a blender.
Our focus is on the pulse function because that’s the only feature we’ll be using to grind meat until we’re satisfied with the size.
We also need power but, in theory, pretty much all countertop blenders are satisfyingly powerful for a very versatile use.
Thus, my focus was on countertop blenders when it comes to kitchen appliances that make minced meat. However, you could also try it in your personal blender and see how it goes.
Since pretty much any countertop blender would work, in theory, to puree meat, I tried to focus on reviewing models that will match all budgets.
The Hamilton Beach is the cheapest, a perfect model for those with a budget under $50.
The two Ninja models are two of my favorites and a top pick, in my opinion. We get power, a lot of accessories, very helpful programs, and decent prices.
Vitamix E310 can be perfect for those who only want this brand.
And Breville Super Q is a powerful, sleek kitchen appliance that looks as expensive as it is. It might temp those with budgets above $500.
Besides searching for the best blender for pureeing meat, I also included some quick steps for grinding meat successfully that I think you should pay attention to, it’s all very easy.


